
Salesforce Hacks # 3 : How to use Workbench Metadata for Deployments
- caleksiev
- Feb 21, 2023
- 2 min read
Updated: Sep 20, 2023
This one I learned just recently thanks to my friend ( and onboarding buddy for life ) Mariyan Topalov. It gives us a way to use Workbench for deployments from one org to another, which you may find very useful.
So, let's begin!
Download and install this chrome extension, called Force.com Migration Tool Package Creator, link
Log into Workbench with the credentials for the org that we are going to retrieve data from. In my example this is my Dev environment

Once you are logged in, click
Info
Metadata Types & Components

Choose the desired Metadata / Component in the Search field and mark the checkbox next to it, so that you can see it in your XML file on the left ( this is the magic from the extension we downloaded in step 1 )
HINT: list of metadata types
After choosing a custom field for example

Click Download XML under Package XML on the left
Open the XML file with Notepad or Notepad++ and edit the version to be the same number as it is in your workbench

Than, click
Migrate
Retrieve

Upload your XML file ( these are the things that we want to first retrieve, than deploy ) and check Single Package
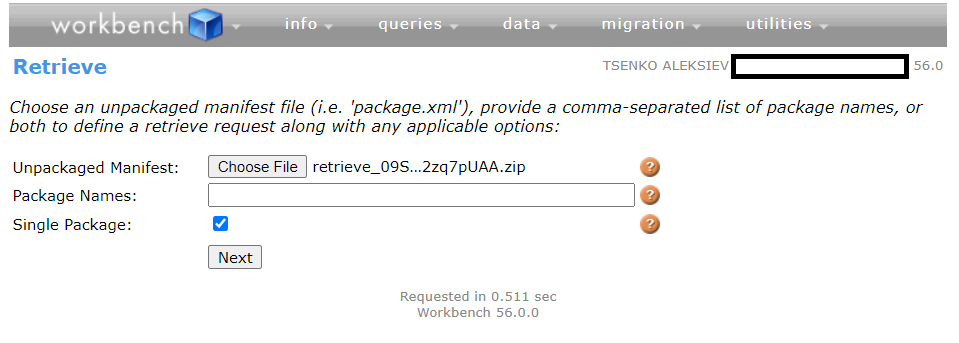
Next and Retrieve. Wait for the retrieval to finish and check your status message

Download the ZIP file and logout from Workbench. Log in again, but this time use the credentials for the target org.
Go to
Migration
Deploy
Upload your ZIP file ( from previous step )
Check these checkboxes Check Only
Rollback On Error
Single Package
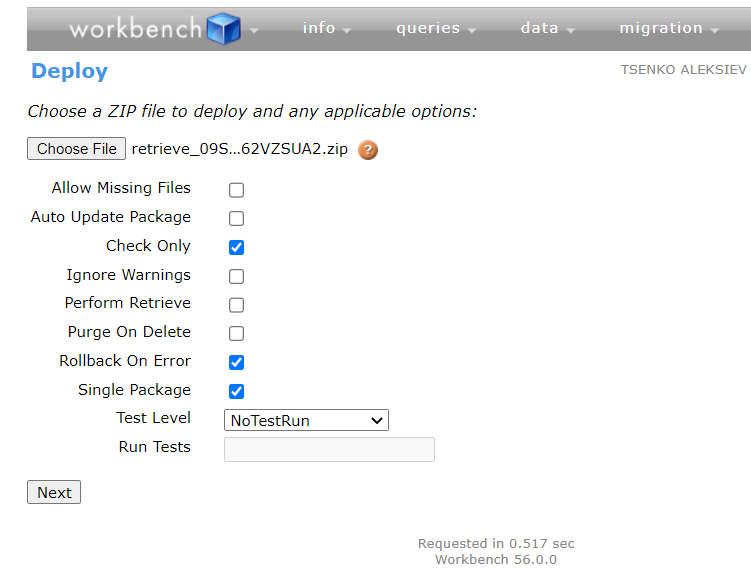
Next and Deploy. Don't worry, because we are only checking if everything goes as planned.

If no errors are found, we are good to go, to do this last step once again, but this time, check only these checkboxes AND NEVER EVER EVER EVER EVER forget them!!!!

DONE! You can now go to your target org and check your changes. If you find any errors during check phase, expand the folder with errors, see what's in there, go back and make the changes needed!
Thank you, Mariyan, for the valuable lesson!


It's fascinating how much control and flexibility Workbench offers for deployments, especially with the 'magic' of that Chrome extension for generating the XML. This method provides a granular approach to metadata management that's often more efficient for targeted changes than full change sets, avoiding unnecessary dependencies. While Salesforce metadata is unique to the platform, the broader concept of metadata management extends to various file types often handled within or alongside CRM systems. For those instances where you need to inspect embedded information in files like images, having a dedicated EXIF data reader can be incredibly useful for auditing or content integrity.
It's fascinating how the Force.com Migration Tool Package Creator extension truly brings the 'magic' to generating the XML for Workbench deployments, as you described. That ability to easily select and retrieve specific metadata types is a huge time-saver and significantly reduces the potential for errors compared to manual XML crafting. It really highlights the power of targeted tooling in streamlining complex processes. This precision in identifying and leveraging specific components for optimal outcomes isn't just confined to technical deployments. It's a fundamental principle that applies across various fields where data-driven decisions are key to success. For instance, in creative domains like photography, leveraging intelligent systems for finding the best photo spots with AI can transform how professionals plan and execute…
If you're curious to Unlock detailed image data from your photographs, an online EXIF reader is the way to go. This metadata can reveal a wealth of information beyond just what you see visually. You can discover the exact date and time the photo was taken, the specific camera and lens used, exposure settings, whether the flash fired, and much more. It’s a valuable tool for photographers who want to meticulously track their settings or for anyone interested in the technical aspects behind a photograph. It's like a digital fingerprint for your images.
The hidden data in your photos, known as EXIF data, can include details you might not want public. If you're looking for a free tool to remove photo metadata, online removers are very effective. You just upload your image, and the tool processes it to remove information like GPS coordinates, camera serial numbers, and capture times. This is particularly useful for activists, journalists, or anyone concerned about maintaining anonymity or protecting sensitive location information when sharing visual content online. It’s a simple precaution with significant privacy benefits.
For photographers looking to Analyze camera settings, GPS location, and more from their images, an EXIF reader is indispensable. Online tools make this process incredibly easy – just upload your photo, and it will parse and display all the embedded metadata. This can be crucial for understanding why a particular shot worked well (or didn't), for organizing your photo library based on equipment used, or even for verifying the authenticity or origin of an image. It provides a deeper look into the story behind the picture.